
“I don’t think there’s any such thing as teaching people photography, other than influencing them a little. People have to be their own learners. They have to have a certain talent".
Imogen Cunningham
First Designs
My involvement in Pinhole Photography started early on in my teaching career when I was given the task of teaching ‘the basics of photography’, to three groups of new students. Not too difficult on the face of things but the real challenge was the equipment…we didn’t have any… apart from some black and white photographic paper and access to a darkroom. Necessity is the mother of invention someone once said, and as a result I quickly devised a pinhole camera project for these three classes. For the first prototype camera I hastily taped together some old 10” x 8” Ilford paper boxes which not surprisingly accepted the 10” x 8” paper easily. For the demonstration purposes and for the large group shots, it work perfectly and an old wooden stool served as a tripod. Composition was successfully achieved by sight lines drawn on the camera.

George with the first pinhole class
The negative image was contact printed onto another sheet of paper to give the positive. This taught the students a great deal about the basics, and indeed I still use a more refined version of this same project today to demonstrate how shutter speeds and apertures work together to control exposure. The resulting depth of field shows how these basic controls affect the final image.
The cost of the photographic paper meant that a smaller camera had to be devised quite quickly, and so a simple box and lid design cut from a single sheet of black mounting card was designed to take a sheet of 7” x 5” paper. The pinhole, like the first design, was cut into a small sheet of kitchen foil which was placed over a small hole cut into the camera body. Small strips of folder card in the back corners held the paper perfectly. This camera design continued to be used for many years until the need to encourage recycling led to our third generation and most successful pinhole camera design.
The Brownie Project

When my twin daughters were in the Brownies I agreed to do a project with the whole group so they could pass their photography badge. In order to pass the requirements of the badge I had to set them a number of challenges including the number of images taken and contact printed to produce the positive images, I also asked for several different subjects. The cameras we used for the project were based on the original design I had made with students before, and were constructed from a single sheets of black mounting card to form a cardboard box with a lid. They were simple to make and accepted a full sheet of 7" x 5" photographic paper. Those days we had a very successful Science Festival in Wrexham and it seemed the ideal opportunity to run the project and share the results with the general public. using a simple washing line, several small dishes, chemicals and a safe light we set up a temporary darkroom in a store room at the festival and the group of Brownies went off taking their pictures.
They quickly got used to guessing the correct exposure for their cameras and really enjoyed the novelty of being able to see their pictures developing in the chemicals before their eyes. When they were fixed and washed we were able to hang their finished prints up for the visitors to the Festival to see while they dried. They produced some excellent pictures as you can see from the couple I have included on this page. It also demonstrates the quality of the images that these simple cameras are capable of which is why I always pinhole cameras to work with all students who are new to photography. They also quickly understood the possibilities of using the huge depth of field that pinhole cameras produce and got very close to their subjects with great effect.
These were some of the images that the little Brownies took the weekend of the Wrexham Science Festival. The whole thing was great fun and as a result the group were awarded their photo badge!


Biggest Pinhole Camera in Wales
At the same Festival we were invited to come up with an idea for a stand for the college and quite liked the idea of building the biggest pinhole camera in Wales! The idea was inspired by a project I had seen by Mabel Oddessey in Bradford in 1987, although her camera was far more elegant than mine! Ours took 2 foot by two foot images using the large rolls of photographic paper that Kentmere very kindly supplied to us as part of a sponsorship deal. The paper was cut to size in the darkroom and loaded into thick double black bags for transportation.
To take a picture you climbed into the camera and clipped the paper to the back of the camera, and then the lens cover was removed while still inside the camera to expose the paper. The paper was then stored back in the light tight bags to be returned to the darkroom for development in plastic troughs by rocking the giant prints in the chemicals. The negatives were eventually contact printed using a large wooden frame and a sheet of glass to keep everything flat. That's me on the left with my old friend Jim. The following year at the Festival we substituted the pinhole for a 1 dioptre lens supplied by a local optician to turn the pinhole camera into a Camera Obscura to show the children who climbed into the camera how an image was formed. Great fun!

Coca-Cola can cameras
I continued to refine the project and always used simple pinhole camera to teach the basics of aperture/depth of field as it is still the most effective way of demonstrating the magic of photography. It was a fun project and they were amazed when they were told they were going to make their own cameras! I also found that if students didn’t have to worry about using an expensive camera and all its settings, they will be freed up to produce more creative images in my opinion.
Many other photographers have used various empty cans for their pinhole cameras, but the design of ours was genuinely developed to suit our students' needs, and has some interesting features which may help others. This project starts with an empty Coca-Cola can. (I wasn’t sponsored by the company, but Coca-Cola cans were made out of the softest material and were the easiest to work with and easily make very small holes in). They take a half sheet of 7” x 5” photographic paper, and the whole thing is made entirely from recycled materials, including our postal tube ‘tripod head’ design.
We used the type of can opener which works horizontally to remove the top cleanly. It is essential to use emery paper to remove any sharp edges when the top is removed. You can then make the pinhole itself roughly halfway up the can with a very small needle. I find that the smallest hole you can make will work the best, but don't push the needle all the way through the can, just barely pierce the metal. Again it is a good idea to remove the sharp edges where you have made the hole with emery paper then be sure to gently pass the point of the needle into the hole once more to clean any debris from the hole. Health & Safety reminder here, I always push the eye end of the needle into a small piece of wooden dowel as it is really quite sharp!
I use a recycled cereal box front to make the top for our camera. It is cheap and doesn’t allow light to pass through it. Draw around the can to make a disc the same diameter as the can, and cut out. Then cut a strip about 30 mm wide and long enough to go around the can and overlap 30mm. Wrap the cut strip around the can and tape together with masking tape to give a snug fit. While the strip is still around the can, position the circle on top and tape that to the strip. The whole top is made light-tight by covering with black electricians’ tape. That pretty much is the finished camera. I have found it a good idea to draw a circle around the pinhole itself with a sharpie pen so we can find it easily in the darkroom. A small piece of black tape over the hole is your ‘shutter’ to prevent accidental exposure.
The camera performs very well and gives a pleasing distortion in the images due to the curved shape of the can which holds the paper in the same shape of course. As it only takes a half sheet of photographic paper, it is also economic to use with students. We used to use a second sheet to do a contact print in the darkroom to produce the positive print, but it far quicker to scan the negative and teach basic Photoshop skills to correct, manipulate and invert the image and commercially print the final images later if you want to.
Postal tube camera holder.

Postal tube camera holder.
One feature I developed for using the coke can pinhole cameras was a 'camera holder' which was screwed to the tripod head. It is made from a recycled postal tube cut lengthways. A wooden disc the same diameter as the can is cut from waste wood. A short section of the postal tube is stapled around the disc. A small hole drilled in the bottom of the wooden base to accept the 1/4 inch tripod screw, and with care lasts a while. This allows the students to shoot from any height and location rather than search for a suitable firm base to position the cameras. It also helps them to keep the camera very still for the longer exposures required by these cameras. If the fixing in the wooden base becomes too loose, just drill another hole!
These are a few of the images my students took with their Coca-Cola can cameras around the college with me. They managed to find some great viewpoints and I particularly like the distortion caused because the paper was curved and the huge depth of field was also a feature.

For the first image, the camera was balanced on a radiator near the top of the staircase down to the college darkrooms and worked particularly well to reproduce the range of tones it captured. Pretty impressive for an old drinks can with a hole in it.

The second image by the same student of a row of silver birch trees which created a wonderful dappled light and lots of detail with a little movement. A great combination.

The third was taken on the first level of one of our fire escapes, and again worked well because of the low angle and quite dramatic perspective.

The last image was a lot of fun. It was taken near the entrance to the college and again the low angle exaggerates the perspective of the scene beautifully. I believe the person in the background may be me working with another student.
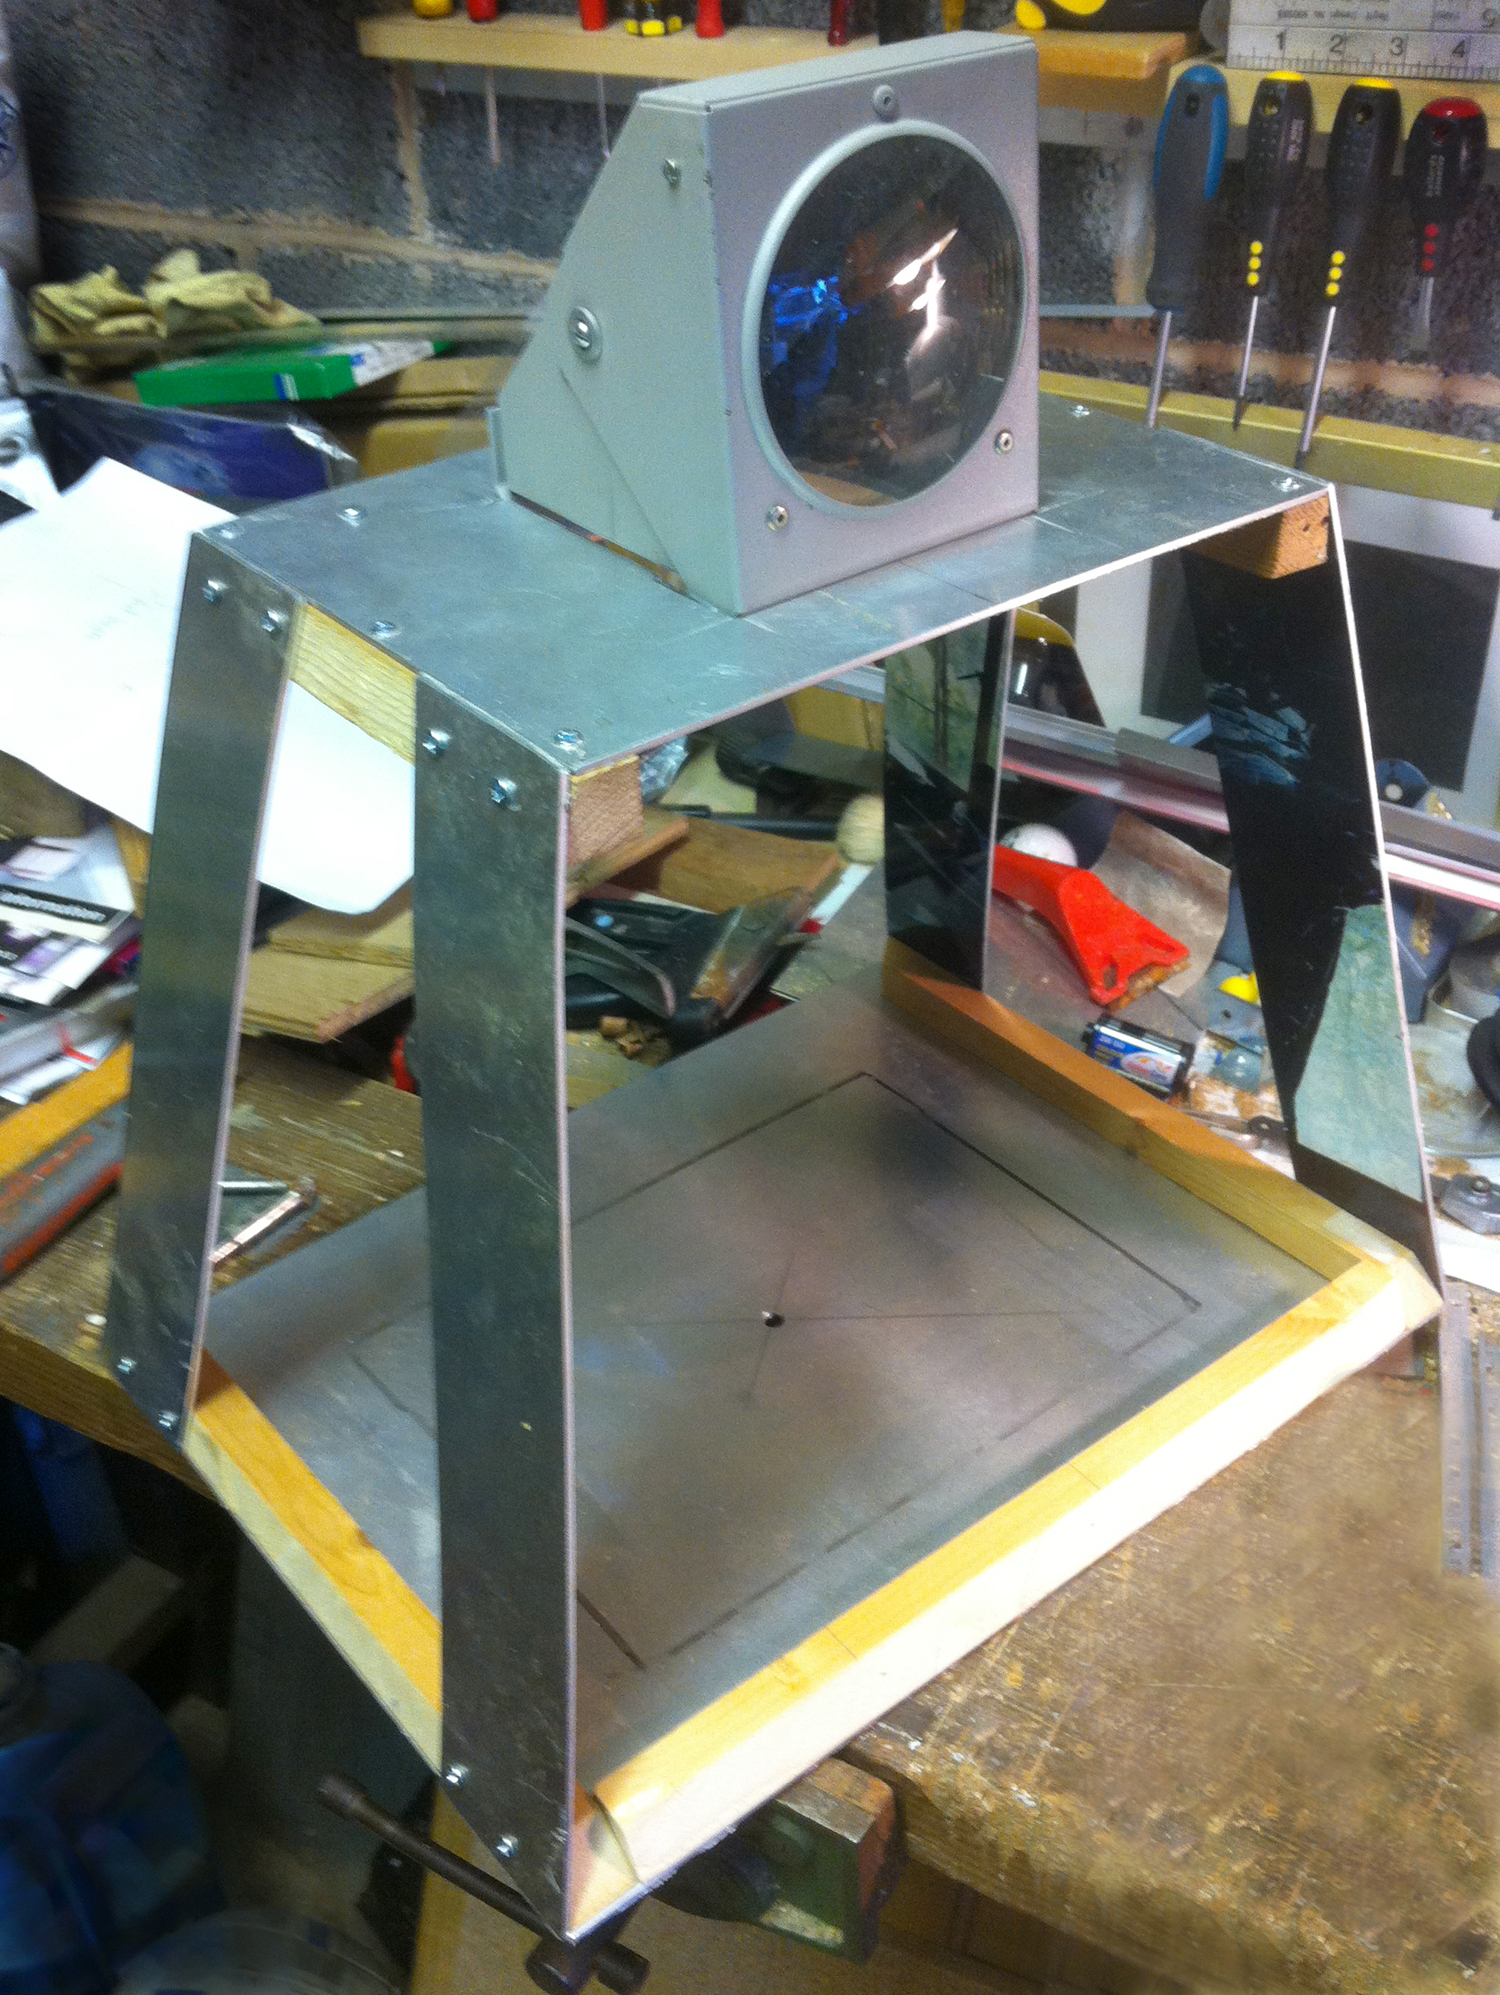
Camera Obscura framework before the dark cloth was added
The Camera Obscura
I had always been interested in the camera obscura and particularly the portable artist version and decided to build one to use in my teaching. The lens assembly I used came from a scrapped Overhead Projector. The new data projectors were being used a lot more in teaching, and several of the old OHPs were disposed of at the college. It was an ideal solution as it was designed to work with an A4 sized base, and this suited the scale I wanted to work with, but rather than project from the transparency on the illuminated base onto a screen, it would project the scene outside down onto the sheet of paper below.
I built the camera obscura from recycled aluminium, and the whole thing was bolted together on a wooden base which mounted onto a standard tripod so it could be used on location just like the early artists.
I incorporated material from David Hockney's excellent documentary ‘Secret Knowledge’ into the lessons, where he traced the use of optical devices such as the camera obscura by artists to aid their understanding of perspective. I asked the students to produce two drawings of a scene around the campus, one freehand the other using the camera obscura to trace the outline of the projected image. The sessions gave them a better understanding of perspective and lenses, and linked those early optical devices with the cameras we know today.